Your organization relies on a valuable web application, but data silos hinder efficient workflows. Rebuilding the app within Salesforce is time-consuming and unnecessary. Introducing Salesforce Canvas, your bridge to seamless integration. Salesforce Canvas is a powerful framework that integrates third-party web applications and offers seamless integration, a unified user experience, and enhanced functionality. Key use cases include replicating app functionality, custom search tools, document generation, and complex calculations. This blog focuses on Canvas authentication methods, including Signed Request and OAuth 2.0, detailing setup and testing processes for each.
Introduction
What is Salesforce Canvas?
Canvas is a powerful framework equipped with tools and JavaScript APIs. It empowers you to transform your existing web application into a Canvas App, seamlessly integrated within the Salesforce interface. Think of it as a plug-and-play solution, eliminating the need for costly and time-consuming redevelopment.
Benefits:
- Effortless Integration: Leverage your existing web application, saving development time and resources.
- Unified Experience: Users access both applications within Salesforce, streamlining workflows and boosting productivity.
- Enhanced Functionality: Extend Salesforce capabilities with the unique features of your web application.
Before diving into Canvas, consider simpler alternatives if authentication and deep communication are not crucial. However, for seamless integration with robust data exchange and authentication, Salesforce Canvas is the champion. Let's explore its capabilities and build a bridge between our web application and Salesforce. But before that let’s explore some of the use cases.
Use Cases
Scenario 1: Replicate Java/Node App Functionality in Salesforce
Imagine your enterprise thrives on a custom web app built with Java or Node. Now, you want to harness its functionality directly within Salesforce, eliminating context switching and boosting efficiency. Canvas makes this possible! Seamlessly integrate your app as a Canvas App, providing users with familiar features without leaving the Salesforce interface.
Scenario 2: Supercharge search with a custom tool
Need a robust, custom search tool integrated within Salesforce? Canvas steps in once again. Embed your search tool as a Canvas App, empowering users to uncover relevant information quickly and efficiently, all within the familiar Salesforce environment.
Scenario 3: Streamline document generation with seamless integration
Tired of manual document generation processes? Leverage Canvas to integrate your document generation tool seamlessly. Users can create and access crucial documents directly within Salesforce, streamlining workflows and saving valuable time.
Scenario 4: Simplify complex calculations with an integrated tool
Dealing with intricate calculations that hinder your team's progress? Canvas provides the answer. Integrate your complex calculator tool as a Canvas App, allowing users to perform calculations directly within Salesforce, eliminating data transfer and ensuring accuracy. In this blog, major focus is to explore the authentication mechanism of Canvas Apps which is pre-requisite of configuring SF Canvas in detailed.
Technical Steps for Canvas setup:
There are 2 ways of authentication –
- Signed Request - This is the default authorization method for canvas apps. The signed request authorization flow varies depending on whether the canvas app’s Permitted Users field is set to "Admin approved users are pre-authorized" or "All users may self-authorize." For our demo purpose, we are going to leverage the "Admin approved users are pre-authorized" flow.
- OAuth 2.0 - When using OAuth with Canvas, there are 2 options User-agent flow & Web server flow.
Canvas Previewer – Salesforce provides a tool to preview the Canvas before publishing to the required locations. Navigate to Setup & search for Canvas Previewer.

Option 1 - Signed Request
Pre-requisite – Create 2 orgs, named them as Canvas source & Canvas consumer. Consider org “Canvas Source” an application hosting platform & org “Canvas Consumer” is the place where connected apps will get created.
Perform below steps in respective ORG as mentioned -
- Canvas source -
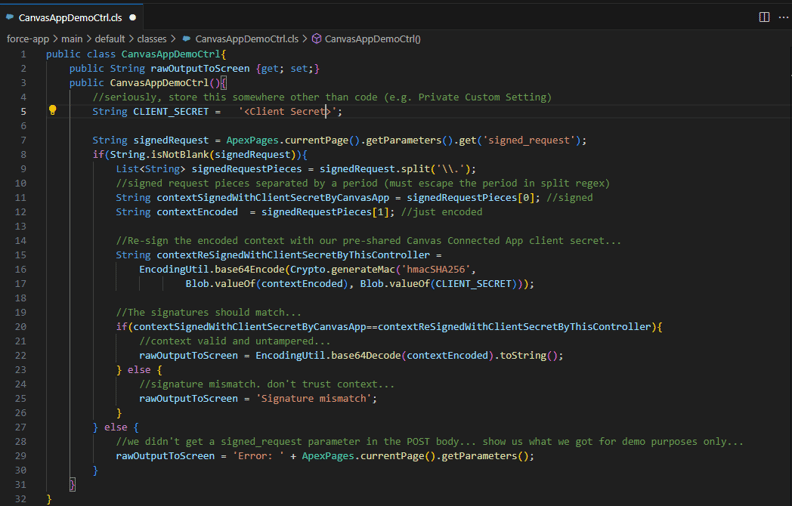
- Create VF Page & Apex class as mentioned - VF Page – CanvasAppDemo, Apex class – CanvasAppDemoCtrl. Please note to replace the client secret string value in apex class line number #7 with client secret generated with connected app.


- Create a digital experience in Salesforce & enabled the VF page “CanvasAppDemo” to guest user. Ensure that guest user profile must have access of VF page & note down the absolute site URL of VF page.
- Canvas Consumer –
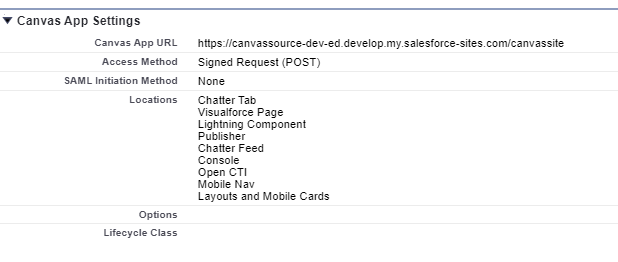
- Create a new connected App with below details. Take the note of access method.


- Copy the generated client secret & replace the client secret string value in apex class line number #7 with the copied value.
- Click on “Manage”, edit the policies & update the permitted user configuration & save.

- Add the profiles or permission set to the connected app.

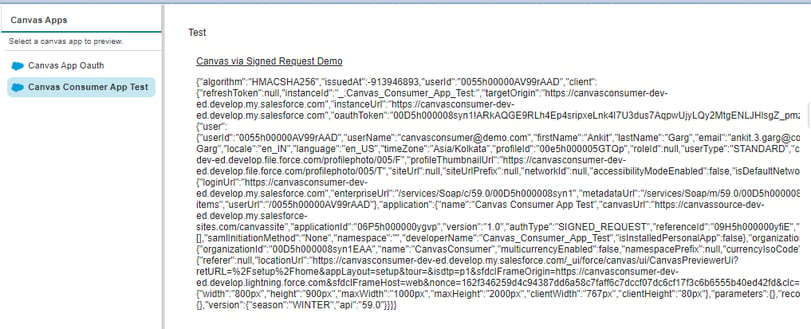
- Testing – Go to setup, search for Canvas App Previewer & click on “Canvas Consumer App Test”. Here we can clearly see the decoded signed request string with all details.

Option 2 - OAuth 2.0
When using OAuth with Canvas, there are 2 options User-agent flow & Web server flow. We are going to implement the demo for user agent flow, we are going to use the same 2 orgs.
Perform below steps in respective ORG as mentioned -
- Canvas source -
- Create 2 VF Pages - CanvasAppDemo1 & CanvasCallback. Code for both VF pages is shown below. Please add both VF pages to the public community or site. Also take the note of client_id & redirect_uri parameters value. Client Id will be generated on while creating the connected app & redirect_uri will be the site URL of callback VF page. Ensure that guest user profile must have access of VF pages.


- Canvas Consumer -
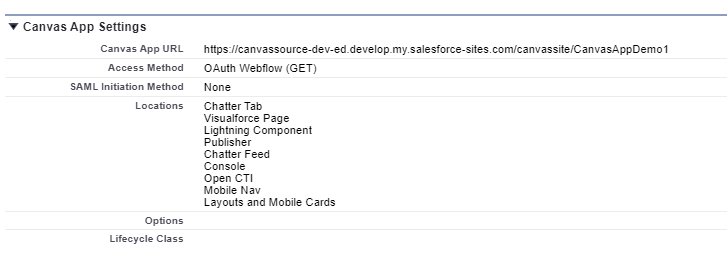
- Create a new connected App with below details. Take the note of access method.


- Copy the generated client_id & replace the client_id parameter value on VF page.
- Testing – Go to setup, search for Canvas App Previewer & click on “Canvas App Oauth”. Click on “Login” link. Authorization popup will occur. Allow the access. Access token will get displayed on screen.

Conclusion
Choosing the right authentication method for your Canvas app depends on several factors. Here's a breakdown:
- Ease of Implementation: Signed request boasts a simpler setup compared to OAuth, requiring less code and configuration.
- Development Efficiency: Its streamlined nature translates to faster development times, making it attractive for quick integrations.
- Security Considerations: While convenient, signed request offers a different security profile compared to OAuth. It relies on Salesforce's signing mechanism, suitable for specific use cases but may not align with stricter security requirements.


